
Why Patch Manager?
AWS SSM Patch Manager is an automated tool that helps you simplify your operating system patching process, including selecting the patches you want to deploy, the timing for patch roll-outs, controlling instance reboots, and many other tasks. You can define auto-approval rules for patches with an added ability to black-list or white-list specific patches, control how the patches are deployed on the target instances (e.g. stop services before applying the patch), and schedule the automatic roll out through maintenance windows.
These capabilities help you automate your patch maintenance process to save you time and reduce the risk of non-compliance. All capabilities of EC2 Systems Manager, including Patch Manager, are available free of charge so you only pay for the resources you manage.
The article can be used to configure patching for instances hosted in AWS Platform.
You will need to have the necessary pre-requisite knowledge regarding, EC2, and IAM section of the AWS. If so then please read on.
The configuration has three major sections
- EC2 instance configuration for patching
- Default Patching Baseline Configuration
- Maintenance Window configuration.
1 Instance Configuration
We will start with the First section which is configuring the Instances to be patched. This requires the following tasks.
- Create Amazon EC2 Role for patching with two policies attached
- AmazonEC2RoleForSSM
- AmazonSSMFullAccess
- Assign Roles to the EC2 Instances
- Configure Tags to ensure patching in groups.
Important: The Machines to be patched should be able to contact Windows Update Services. Mentioned below article contains the URLS which should be accessible for proper patch management.
https://technet.microsoft.com/en-us/library/cc708605(v=ws.10).aspx
Mentioned below are the detailed steps for the creation of an IAM role for Instances to be Patched using Patch Manager.
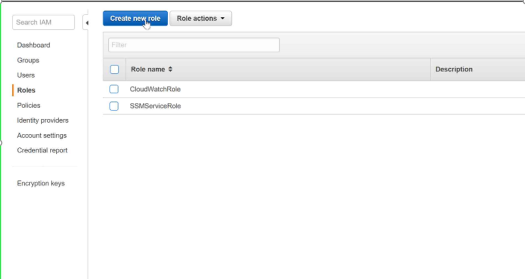
Step 1: Select IAM —–> Roles and Click on Create New Role
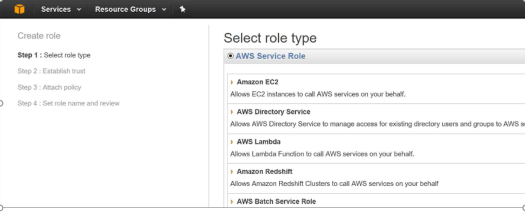
Step 2: Select Role Type —-> Amazon EC2
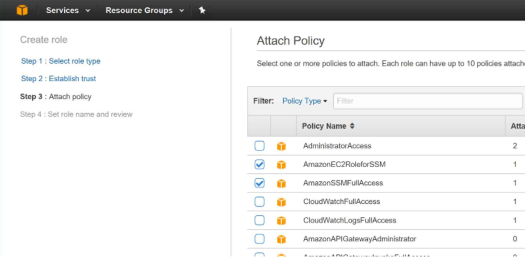
Step 3: Under Attach Policy Select the following and Click Next
- AmazonEC2RoleForSSM
- AmazonSSMFullAccess
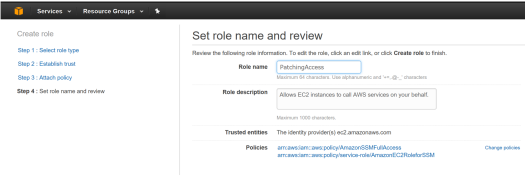
Step 4: Enter the Role Name and Select Create Role (At the bottom of the page)
Now you have gone through the first step in your patch management journey.
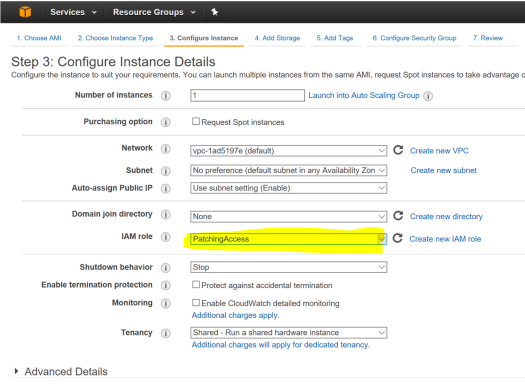
Instances should be configured to use the above created role to ensure proper patch management. (or any roles which has AmazonEC2RoleforSSM and AmazonSSMFullAccess policies attached to it.)
We need to group our AWS hosted servers in groups cause no one with the right frame of mind wants to patch all the servers in one go.
To accomplish that we need to use Patch Groups (explained later).
For example:
We can configure Patch manager to Patch EC2 instances with Patch Group Tag = Group01 on Wednesday and EC2 instances with Patch Group Tag = PatchGroup02 on Friday.
To utilize patch groups, all EC2 instances should be tagged to support cumulative patch management based on Patch Groups.
Congratulations, you have completed the first section of the configuration. Keep following just two to go.
2 Default Patch Baseline configuration.
Patches are categorized using the following attributes :
- Product Type: like Windows version etc.
- Classification: CriticalUpdates, SecurityUpdates, SevicePacks, UpdateRollUps
- Severity: Critical,Important,Low etc.
Patches are prioritized based on the above factors. A Patch baseline can be used to configure the following using rules
- Products to be included in Patching
- Classification of Patches
- Severity of Patches
- Auto Approval Delay: Time to wait (Days) before automatic approval)
Patch Baseline is configured as follows.
Step 01: Select EC2 —> Select Patch Baselines (under the Systems Manager Services Section)
Step 02: Click on Create Patch Baseline

Step 03: Fill in the details of the baseline and click on Create
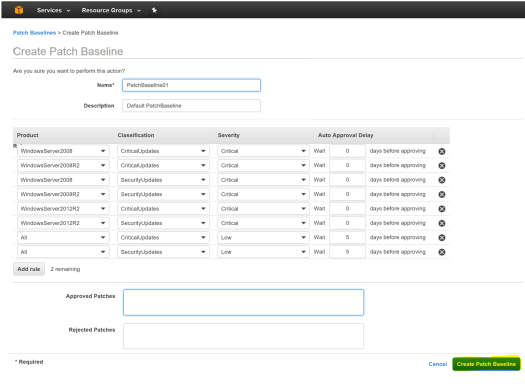
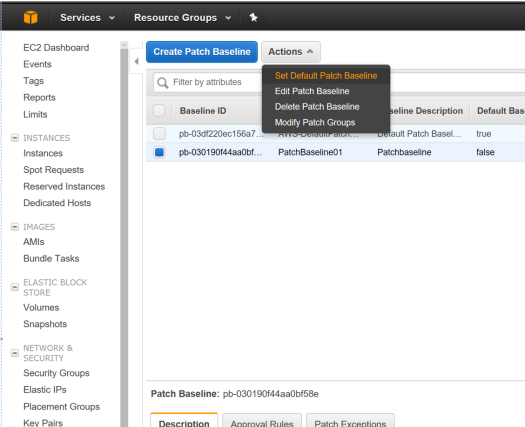
Go to Patch Baseline and make the newly created baseline as your default .
At this point, the instances to be patched are configured and we have also configured the patch policies. The next section we provide AWS the when (Date and Time) and what (task) of the patching cycle.
3 Maintenance Windows Configuration
As the name specifies, Maintenance Windows give us the option to Run Tasks on EC2 Instances on a specified schedule.
What we wish to accomplish with Maintenance Windows is to Run a Command (Apply-AWSPatchBaseline), but on a given schedule and on a subset of our servers. This is where all the above configurations gel together to make patching work.
Configuring Maintenance windows consist of the following tasks.
- IAM role for Maintenance Windows
- Creating the Maintenance Window itself
- Registering Targets (Selecting servers for the activity)
- Registering Tasks (Selecting tasks to be executed)
Mentioned below are the detailed steps for configuring all the above.
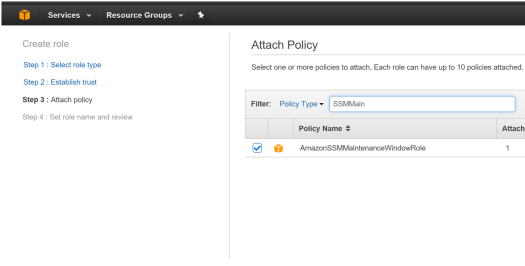
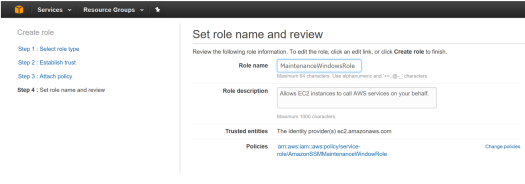
Step 01: Create a Role with the following policy attached
- AmazonSSMMaintenanceWindowRole
Step 02: Enter the Role Name and Role Description
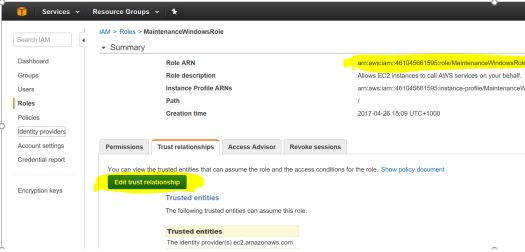
Step 03: Click on Role and copy the Role ARN
Step 04: Click on Edit Trust Relationships
Step 05: Add the following values under the Principal section of the JSON file as shown below
“Service”: “ssm.amazonaws.com”
Step 06: Click on Update Trust Relationships (on the bottom of the page)

At this point the IAM role for the maintenance window has been configured. The next section details the configuration of the maintenance window.
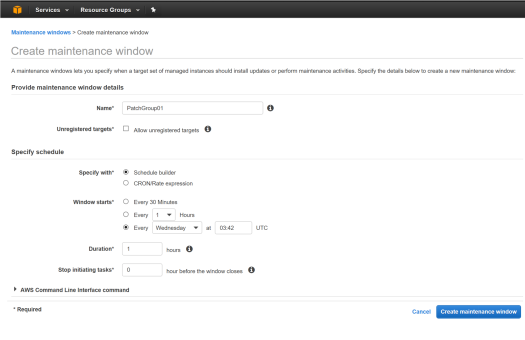
Step 01: Click on EC2 and select Maintenance Windows (under the Systems Manager Shared Resources section)

Step 02: Enter the details of the maintenance Windows and click on Create Maintenance Windows
At this point the Maintenance Window has been created. The next task is to Register Targets and Register Tasks for this maintenance window.
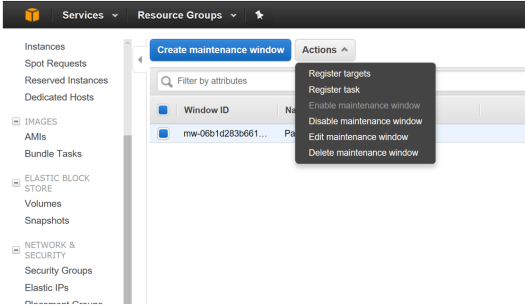
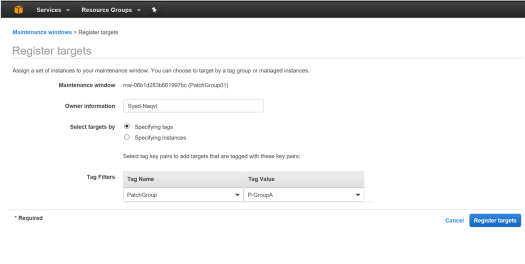
Step 01: Select the Maintenance Window created and click on Actions
Step 02: Select Register Targets
Step 03: Enter Owner Information and select the Tag Name and Tag Value
Step 04: Select Register Targets
At this point the targets for the maintenance window have been configured. This leaves us with the last activity in the configuration which is to register the tasks to be executed in the maintenance window.
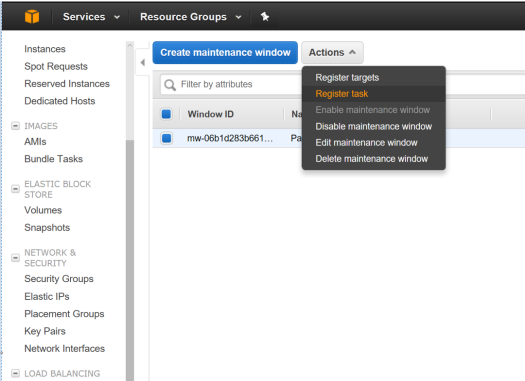
Step 01: Select the Maintenance Window and Click on Actions
Step 02: Select Register Task
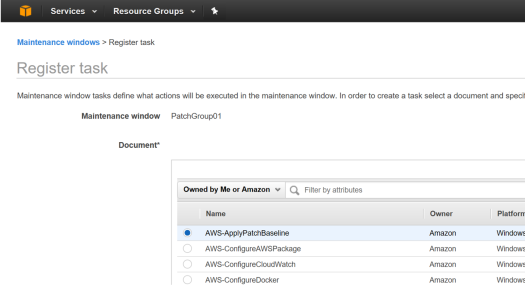
Step 03: Select AWS-ApplyPatchBaseline from the Document section
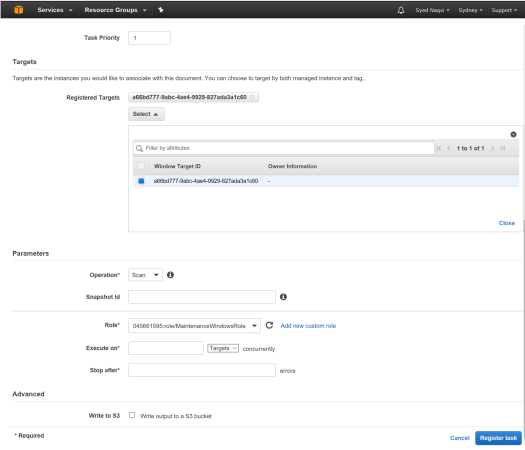
Step 04: Click on Registered targets and select the instances based on the Patch Group Tag
Step 05: Select Operation SCAN or Install based on the desired function (Keep in mind that an Install will result in a server restart).
Step 06: Select the MaintenanceWindowsRole
Step 07: Click on Register Tasks
After completing the configuration, the Registered Task will run on the Registered Targets based on the schedule specified in the Maintenance Window
The status of the Maintenance Window can be seen in the History section (as Shown below)

Hope this guide does get you through the initial patching configuration for your EC2 instances in Amazon.
Also in AWS the configuration can be done using CLI as well. Let’s leave that for another blog for now.
Thanks for Reading.
